Darktable and Nikon Z 30

Visits: 136

Unfortunately the NEF format used by the Nikon Z 30 is not supported by Lightroom 6.0 (yes, that was the last version that I could actually buy and sort of own), so I tried Darktable. The Z 30 is not in the list of supported cameras, but the Z 50 is. And Nikon would not have changed the format within the Z cameras, now would they?

Trying to open one of the files results in error messages:

RawSpeed:Unable to find camera in database: 'NIKON CORPORATION' 'NIKON Z 30' '12bit-compressed'
Please consider providing samples on <https://raw.pixls.us/>, thanks!
[rawspeed] (xxx_0059.NEF) bool rawspeed::RawDecoder::checkCameraSupported(const rawspeed::CameraMetaData*, const string&, const string&, const string&), line 170: Camera 'NIKON CORPORATION' 'NIKON Z 30', mode '12bit-compressed' not supported, and not allowed to guess. Sorry.
[temperature] failed to read camera white balance information from `xxx_0059.NEF'!
[temperature] `NIKON CORPORATION NIKON Z 30' color matrix not found for image
[temperature] failed to read camera white balance information from `xxx_0059.NEF'!
[temperature] failed to read camera white balance information from `xxx_0059.NEF'!
[colorin] could not find requested profile `standard color matrix'!

The same goes for 14bit versions.

However, as the Z 50 is supported, I tried just changing the signature of the files. Darktable is fine with that and can load the files.

However, I do not know if that would lead to issues with eg. white balance or other processing which might be different for the Z-cameras. But it works for me and now. To change the signature of all files in the current directory, you can use:

perl -pi -e 's/NIKON Z 30/NIKON Z 50/g' *

As I found out later, it looks like there is already an issue logged in github regarding the Z 30. The solution described in there works for me – it is after all the same general idea: Z 30 and Z 50 files are essentially the same. If you add the definition to your cameras.xml file (which is at /usr/share/darktable/rawspeed on my system), darktable works with Z 30 files as expected.

Linux: warum geht meine Festplatte nicht in den Schlafmodus?

Visits: 152

Ich habe mich nach langer Zeit wieder entschieden, dass einer meiner Server mit Gentoo laufen soll, statt mit Ubuntu. Im Zuge des Umbaus kam dann auch ein RAID mit netto 30 TB Speicherplatz zum Einsatz.

Ich möchte immer, dass meine Festplatten nur dann angeschaltet sind, wenn sie auch benutzt werden, daher setze ich gewöhnlich mit hdparm -S40 /dev/sd? einen sleep timeout von knapp 4 Minuten.

Nachdem ich alle notwendigen Daten auf das RAID kopiert hatte, blieben die Festplatten noch aktiv.

lsof brachte leider keine Erkenntnis, aber grob jede Sekunde schrieb irgendetwas auf das RAID. Ich bin dann auf laptop mode tools gestoßen, was ich mir auch mal näher ansehen muss. Das verspricht, dass ich Energieoptionen besser einstellen kann und auch, Festplattenaktivität besser analysieren kann.

Aber mit ps aux fiel mir dann noch der prozess ext4lazyinit auf. Dieser sorgt – sehr simple ausgedrückt – dafür, dass die eigentliche Formatierung der Platte im Hintergrund geschieht, und die Festplatte schon genutzt werden kann. Das ist auch schön so, aber ich hätte doch gerne, dass das bald vorbei ist.

Die Geschwindigkeit, in der ext4lazyinit arbeitet, kann mittels mount Optionen eingestellt werden (man 5 ext4):

   init_itable=n
          The lazy itable init code will wait n times the number  of  mil‐
          liseconds  it  took to zero out the previous block group's inode
          table. This minimizes the impact on system performance while the
          file system's inode table is being initialized.

Und das schöne hier ist, dass das im laufenden Betrieb gemacht werden kann:

mount -o remount,init_table=0 <mount point>

Ich hoffe, das ist schon der einzige Prozess, der die Festplatten wach bleiben lässt, aber ich werde es sehen, wenn die Initialisierung wirklich durch gelaufen ist.

Salesforce – Vergleich von 2 orgs

Visits: 403

Das ist mal ein gutes Tool, da bin ich gerade drauf gestoßen: Salesforce Org Compare. Damit kann man die Metadaten von 2 Orgs herunter laden lassen, und die Differenzen (einfach ein Diff auf den heruntergeladenen Daten) anzeigen lassen. Das ist wunderbar, wenn man mal wieder vergessen hat, welche Teile alle für ein Deployment notwendig sind, oder wenn die Orgs unterschiedlich reagieren, und man keinen Anhaltspunkt hat, warum das so ist.

Es sollte eigentlich nicht notwendig sein, schließlich weiß man genau, was man geändert hat, der Kollege hat auch nicht auf einer anderen Sandbox widersprüchliche Sachen geändert…

Thermische Probleme mit Raspberry Pi 4

Visits: 516

Der Raspberry Pi 4 sieht mit seinem Gigabit-Ethernet und den USB-3 Ports genau danach aus, was mir die ganze Zeit fehlte. Einer meine 3er-Pis spielt seit geraumer Zeit mit 3 externen Festplatten NAS. Das natürlich nur unbefriedigend, da mit USB 2 und 100 MBit bei dmcypt-verschlüsselten Platten in guten Fällen 6 MB/s per Samba übertragen werden. Das reicht für vieles, aber längst nicht alles, was ein NAS so tun soll.

Der Pi4 kopiert von dmcrypt zu dmcrypt mit etwa 70 MB/s (über Samba kommt bei mir dann etwa 50 MB/s an – bei großen Dateien), das ist die richtige Richtung. Allerdings lief er beim Kopieren von 2 TB nicht durch, sondern stürzte mit einer Kernel Panic ab. Wenn der als NAS funktionieren soll, muss er auch stabil sein, schnell alleine reicht nicht.

Mit fiel schon beim ersten Starten auf, dass vor allem die USB-Anschlüsse sehr warm werden, die CPU war auch fast nicht mehr anfassbar. Spätestens in einem Gehäuse kann die Wärmeableitung nicht mehr reichen. Bei Tom’s Hardware wird berichtet, dass eine neue Firmware den USB-Controller kühler laufen lassen soll, Tests zeigten 2°C Unterschied, was aber bei weitem noch nicht für den Betrieb in einem Gehäuse ausreicht. Meine Messungen (billigstes Infrarot-Thermometer) des CPU- und RAM-Chips zeigten Oberflächentemperaturen bis 62°C, wenn auf dem Bildschirm das Thermometer erscheint, und auch Thermal Throttling hinweist.

Mit

vcgencmd measure_temp

kann der CPU-Sensor ausgelesen werden. Bei 80°C auf dem Sensor zeigt sich das Thermometer. Meine Versuche bestätigen, dass bei Last nach etwas mehr als 3 Minuten der Prozessor bremst – kopiert der Pi verschlüsselte Dateien, haben alle Chips gut zu tun.

Mit aktiver Kühlung durch einen Lüfter (120mm auf 5 V statt 12 V, so nicht hörbar, und so aufgestellt, dass etwas Luft über die Chips zieht) bleibt der Sensor zwischen 50°C und 60°C, die Oberfläche liegt dann bei akzeptablen 36°C. Im Moment habe ich keine weiteren Abstürze, vielleicht ist die Temperatur das einzige Problem. Auf jeden Fall lasse ich den nur dann als NAS laufen, wenn ich einen Lüfter dran stellen kann, andernfalls ist mir das eine zu heiße Sache.

Atmel Atmega ISP Programmierung schlägt fehl

Visits: 1288

Von Pollin gibt es für 2,99 € ein ‘Entwicklungsboard’ mit einem Atmega 168PA drauf. Die Beschreibung ist dürftig, insbesondere, wie der In System Programmiert werden kann. Bei mir lag so ein Board etwas länger rum, weil einfach die Zeit fehlte.

Durchpiepen der Leitungen zeigte dann, dass der Programmer an folgende Pins am Pollinboard angeschlosen werden musste:

ICSP 1 (MOSI) – 11
ICSP 2 (Vcc) – Vcc
ICSP 4 (Gnd) – GND
ICSP 5 (RST) – RST
ICSP 7 (SCK) – 13
ICSP 9 (MISO) – 12

Vergleiche dazu das Anschlusslayout des Olimex Programmers.

Aber alles, was ich versuchte, die Kommunikation funktionierte nicht. Die Fehlermeldung war:

Timestamp: 2018-10-29 18:08:45.435
Severity: ERROR
ComponentId: 20100
StatusCode: 1
ModuleName: TCF (TCF command: Device:startSession failed.)

Failed to enter programming mode. ispEnterProgMode: Error status 
received: Got 0xc0, expected 0x00 (Command has failed to 
execute on the tool)

Da keine meiner Ideen fruchtete, bin ich diesem Troubleshooting gefolgt. Oszilloskop an der RESET Leitung zeigte dann nicht einen, sondern mehrere (ich glaube 5) Reset-versuche durch den Programmer. Das sollte so nicht sein. Das Lesen der Gerätesignatur in Atmel Studio schickt einen Reset, wenn alles gut geht.

Letztlich stellte sich heraus, dass ich zwar die Pins richtig raus gesucht hatte, aber einfach meiner eigenen Anleitung nicht gefolgt bin. MOSI hatte ich mit GND verbunden, und schon ging nichts mehr.

Ich habe noch weiter getestet mit allen Signalen: bei diesem Fehler kann es ganz einfach sein, dass ein Kabel nicht richtig angeschlossen ist. Am falschen Pin oder ein Kabelbruch – der Fehlercode ist immer derselbe wenn eins der ISP Signale fehlt, egal ob MOSI, MISO, SCK oder RST.

TBS5520SE – Multi-standard TV Tuner USB Box

Visits: 1484

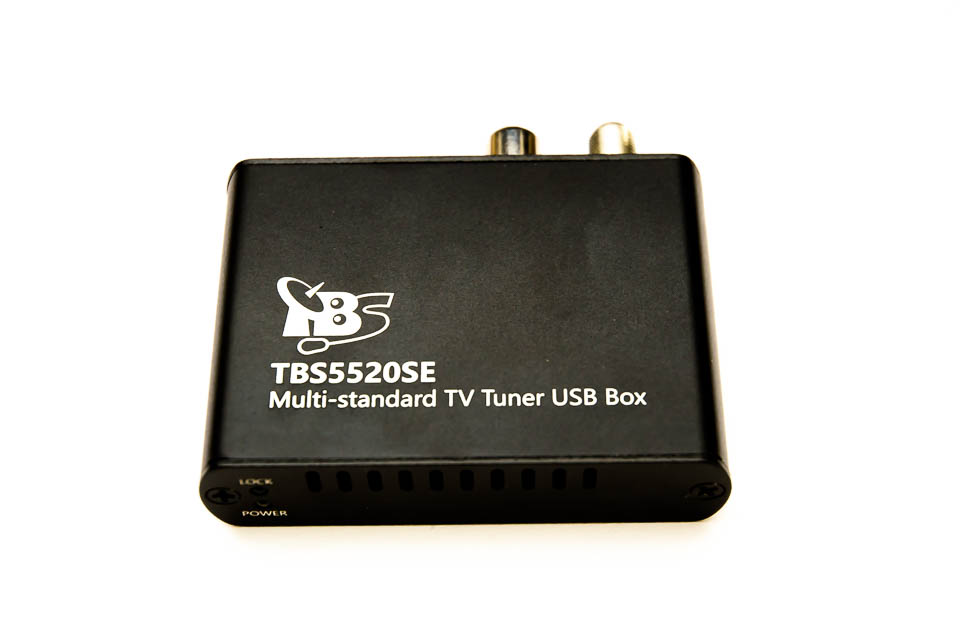
Die kleine Box in schwarzen Metall verspricht, alles an Fernsehsignalen empfangen zu können, was so hier verfügbar ist.

An der Frontseite 2 LEDs, einmal in blau, um zu zeigen, dass das Gerät arbeitet, und einmal in grün, damit wird angezeigt, dass auf der aktuellen Frequenz ein Sender gefunden wurde. Aber davon sagt die nicht wirklich vorhandene Anleitung nichts. Außerdem sind die LEDs viel zu hell, reine Funktionsindikatoren sollten leicht sichtbar, aber nicht grell sein. Neben einem Monitor aufgestellt stört die Helligkeit massiv. 

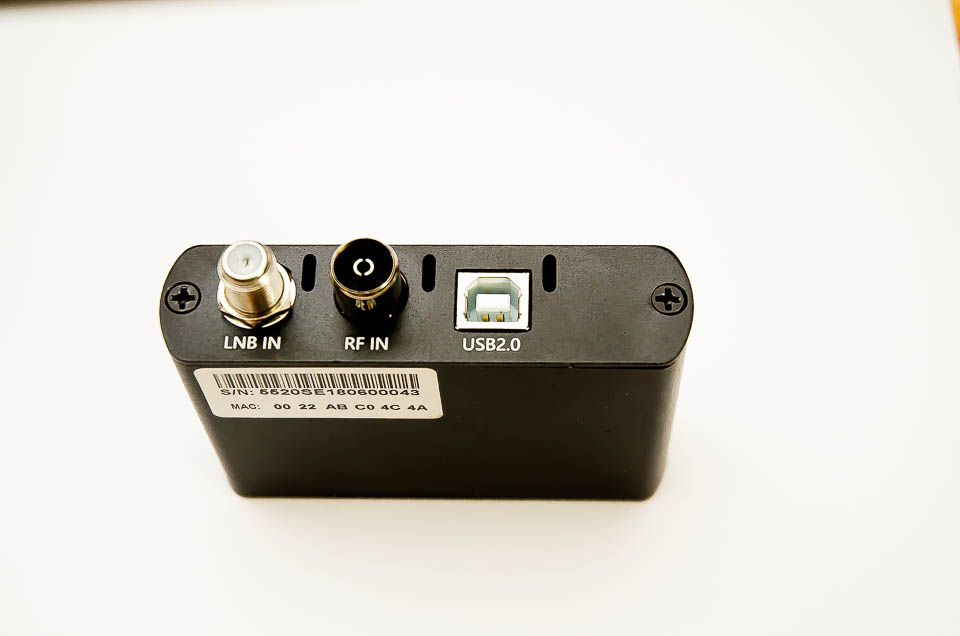
Die Box hat einen Antenneneingang sowie einen LNB-Anschluß und ein USB-2.0 Interface.

Das Gehäuse ist aus Metall und hat ein paar Lüftungsschlitze. Die Beschreibung sagt: “Neben der guten Ausstattung und dem modernen Interface wurde auch auf eine geringe Leistungsaufnahme und damit eine niedrige Abwärme, für geräuschlosen Betrieb, geachtet.”. Ein Lüfter ist sicher auch nicht notwendig, aber das Gerät wird schon warm, die Lüftungsschlitze sind gerechtfertigt und gut.

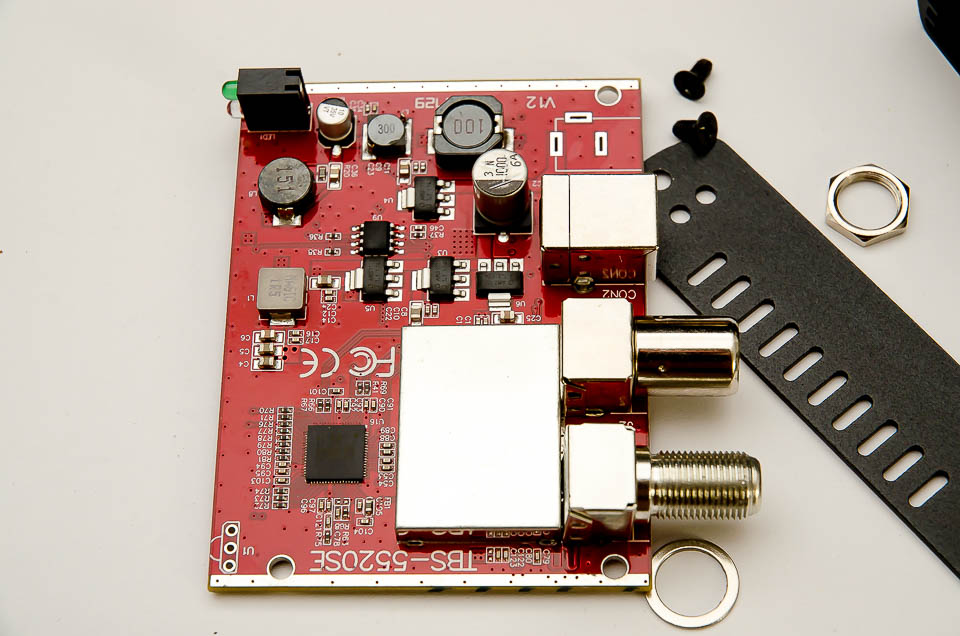
Empfangbar seien DVB-S / S2 / S2X, DVB-C / C2, DVB-T / T2 und ISDB-T. Und das passt auch wunderbar zum zentralen Chip in dem Gerät, dem Si21832B. Dieser dekodiert all diese Standards für uns.

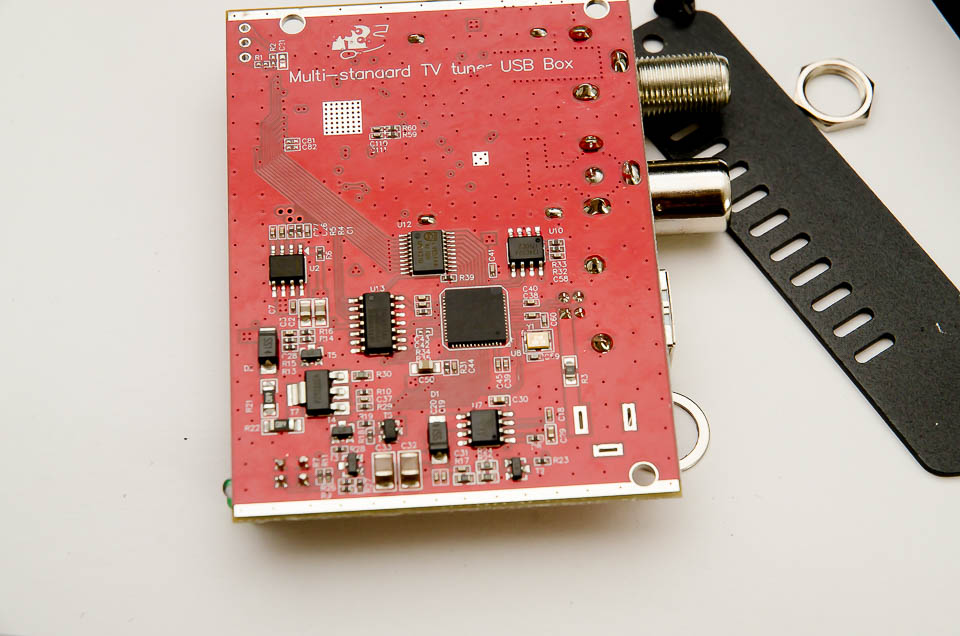
Daneben gibt es noch einen CY7C68013A für die USB-Kommunikation. Außerdem ein paar Verstärker- und Logikchips, aber keine Überraschung.Kommen wir zu den Treibern. Diese können von der Webseite herunter geladen werden, im Lieferumfang ist kein Datenträger – der sowieso nur veraltete Versionen haben würde.

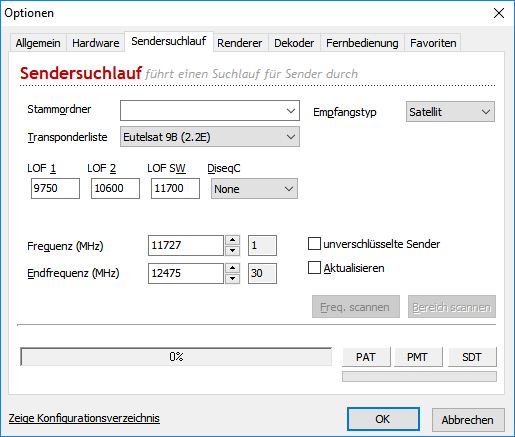
Ich habe zum Ansehen des Video-Streams den kostenlosen TBS-Viewer ausprobiert. Der Sendersuchlauf hatte mich direkt demotiviert. Der Empfangstyp war auf Satellit voreingestellt.

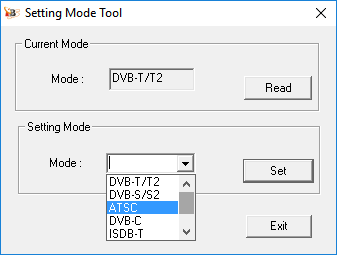
Ein Wechsel auf DVB-T (‘Terrestrisch’) setzt immer die Transponderliste “DMB-TH Hong Kong” als Standard.Ein Suchlauf (Korrekt auf Transponderliste: DVB-T2 Deutschland gestellt) lieferte keinen Sender, über die gesamte Frequenzliste hinweg. Spezifisches Scannen einzelner Frequenzen, die hier definitiv empfangbar sind und unverschlüsselte Sender übertrage (514 MHz und 706 MHz), lieferten auch 0 Sender. Den Grund dafür liefert die etwas schwache Anleitung: absolut wichtig ist TBS 5520 SE ChangeMode-Tool v1.0.0.2, mit diesem kann der Empfangsmodus geändert werden. Bei mir war der auf Satellit voreingestellt; nur mit diesem Tool kann auf DVB-T2 umgestellt werden.

Danach funktionierte dann auch der Suchlauf im TBS-Viewer. Allerdings ist die Empfindlichkeit des Empfängers eher mittelmäßig. Eine mickrige Antenne, die auch an einem Fernseher hier eher schwierigen Empfang liefert, die aber an einer Xoro-Box sehr gut funktioniert, liefert auch am TBS-5520 keinen befriedigenden Empfang. Vermutlich braucht man mit dem Gerät meistens eine aktive Antenne.

Zum Test wollte ich auch den kostenpflichtigen DVB-Viewer installieren – TBS Viewer lief noch – und erhielt die Fehlermeldung, dass DVB-Viewer noch liefe. Meine Vermutung ist da klar, dass der TBS-Viewer eine verfiesemantuckte Version des DVB-Viewers ist.

Also: es funktioniert alles, aber die Dokumentation stinkt schon anrüchig, und die Lösung des Empfangsumschaltens mittels des Change-Mode-Tools ist suboptimal. Technisch Interessierte werden keine Schwierigkeiten damit haben, aber es ist nicht gut.

Ein für mich wichtiger Kaufgrund war die Zusage “Treiber für sämtliche 32- und 64-bit Betriebssysteme befinden sich im Lieferumfang: Win XP, Vista, Win 7/8/10 und Linux.” “Sämtliche 32- und 64-bit Betriebssysteme” … MacOS ist schon einmal nicht dabei, somit ist sämtliche eine leere Versprechung. Linux ist ein verlockendes Versprechen für mich; ich will immer noch den Empfang von Fernsehen auf einem Raspberry Pi machen, und das Dekodieren dann auf anderen Clients. Leider unterstützt der Raspberry Pi h.265 nicht. Linux und sämtliche klingt wunderbar. ARM-Linux scheint da aber nicht wirklich drunter zu fallen.

Mehr zum Linux-Treiber später….

Simple script for setting allowed IP address in tinyproxy

Visits: 870

I’m using a dynamic IP address, but for Salesforce development I need a fixed one. As a proxy with a fixed IP address is enough, I use tinyproxy for that. Of course I cannot afford to have an unrestricted open proxy. Now this small script helps me achieve this in a half-automated way. I ssh in to my proxy-server, call this script, and it takes care of producing an appropriate line in the configuration:


#! /bin/bash
#
# Find the ip address of the calling ssh
callerId=`echo $SSH_CONNECTION | awk '{print $1}'`
#
# Find the allow line and set it to the ip address
sudo sed -i "/# set from script/!b;n;cAllow ${callerId}" /etc/tinyproxy.conf
sudo systemctl restart tinyproxy

In order for this to work, you need a marker in your tinyproxy.conf. This script looks for “# set from script”, and replaces the following line with an Allow-entry.

mods.curse.com might have leaked data

Visits: 352

Some time ago I played World of Warcraft. Hell, was that addictive. I’m kind of happy that I don’t do it anymore. To be effective in raids I needed addons, which I got from mods.curse.com. And as I am wary to give out my main email address, I once again created one exclusively for this purpose.

For a few months now I find spam being sent to that particular address. It’s not an address you would easily guess such as info@ or contact@ or so, it was very particularly tailored so that it would relate both to curse and to my username on WoW. Mails to it are received in my catch-all inbox, where most of the spam lands.

This particular wave of spam is from “Sale4MichaelKors”, “Deals 4 Jordan”, “Pandora Jewelry” and “UGG Boots”. Stuff which I don’t receive for any other email address.

Now, I have contacted the support, but the last reply was “We can confirm that we are not aware of any mishandling of your user data, nor any incidents that would have exposed it. If you would like more information on Twitch’s Privacy Policy please feel free to read up here.”.

The fact remains that this is the one and only place where I used that email address. Either they have sold my information (I do not believe that) or the data has been stolen. I don’t claim it to be a recent leak. I have a Yahoo address, which was definitely compromised, and I could clearly see that the information obtained had not been abused for quite some time after the data leaked. I assume the same is true in this case. So the leak is not necessarily new.

However, I did not get any specifics what the ‘security team’ had looked into. Maybe they only looked at potential incidents this year, I don’t know.

What I know is: this email address was exclusively used with curse.com, and now I receive spam on it. I draw my conclusions from those facts.


Salesforce: $Component-merge fields behaving unexpectedly

Visits: 327

So I was writing a slightly complicated form validation in Javascript. Therefore I needed access to the values of all fields of an <apex:form>. But worse, some fields were shown conditionally.

So I assumed that the validation would merely need to check whether the fields existed, as a conditional rendering does not add the fields to the DOM (in contrast to hiding them with display: none). So my Visualforce page looked something like this:

<apex:page controller="ConditionalRerenderController">
    <apex:form>
        Click me
        <apex:inputCheckbox value="{!condition}" id="firstId">
            <apex:actionSupport event="onclick" rerender="conditionalBlock"/>
        </apex:inputCheckbox><br/>
        <apex:pageBlock id="conditionalBlock">
            <apex:pageBlockSection rendered="{!condition}" columns="1">
                <apex:inputText id="secondId" value="{!stringValue}" /><br/>
            </apex:pageBlockSection>
        </apex:pageBlock>
    </apex:form>
</apex:page>

The JS to get the value of the text input field would be rather simple

var inputfield = document.getElementById('secondId');
if(inputField != null)
    alert(inputfield.value);

However, the attribute id in Visualforce does not translate directly to the HTML attribute of the same name. To make sure a produced id is in fact unique, Salesforce adds information on the context, practically making it unusable to hard-code the id in javascript.

But there is the global merge field $Component which allows to resolve the produced HTML id. So I expected this to work:

var inputfield = document.getElementById('{!$Component.secondId}');
if(inputfield != null)
    alert(inputfield.value);

But inputfield would always be null, no matter whether the checkbox had been clicked before, rendering the input field.

This is quite a problem, as it turns out this merge field is not re-evaluated outside of the block that gets re-rendered. Instead, the expression always evaluates to an empty string outside of the conditionally rendered block. So you would need to put all Javascript that needs an id of an element within the conditionally rendered block.

Or – maybe more workable – you could use class names as pseudo-IDs. If you would add

styleClass="pseudoId"

to the input-field you can access it with

var elements = document.getElementsByClassName('pseudoId');
if(elements != null && elements.length > 0) {
    var inputField = elements[0];
    alert(inputField.value);
}

Have a try, and notice how the id of the text input only appears in the conditionally rendered block.
The page:

<apex:page controller="ConditionalRerenderController">
    <apex:form>
        Click me
        <apex:inputCheckbox value="{!condition}" id="firstId">
            <apex:actionSupport event="onclick" rerender="conditionalBlock"/>
        </apex:inputCheckbox><br/>
        firstId: <apex:outputText value="{!$Component.firstId}" /><br/>
        secondId: <apex:outputText value="{!$Component.secondId}" /><br/>

        <apex:pageBlock id="conditionalBlock">
            <apex:pageBlockSection rendered="{!condition}" columns="1">
                <apex:inputText id="secondId" value="{!stringValue}" /><br/>
                secondId: <apex:outputText value="{!$Component.secondId}" /><br/>
            </apex:pageBlockSection>
        </apex:pageBlock>
    </apex:form>
</apex:page>

The controller:

public class ConditionalRerenderController {
 public boolean condition {get;set;}
 public String stringValue {get;set;}
 
 public ConditionalRerenderController() {
 this.condition = false;
 this.stringValue = 'empty';
 }
}